Swift Everywhere: Bringing Swift Packages to Android
 {: style=“text-align: center; width: 200px; margin: auto;”}
- Table of contents {:toc}
Introduction
Section titled “Introduction”In recent weeks, the Skip team has submitted patches to numerous Swift projects to add Android support to their packages. We’ve been tracking the progress of Android build-ability on our swift-everywhere.org ↗ web site, which catalogs a list of many popular Swift packages and whether they compile for Android. At the time of writing, nearly two thousand Swift packages are building successfully for Android, with more being added every day.
This article will go over what our experience porting Swift packages has taught us, and how you can apply this knowledge to turn your parochial Apple-only Swift package into a universal multi-platform package that can build for not just iOS and macOS, but also for Android.
Package Prerequisites
Section titled “Package Prerequisites”What sorts of Swift packages are good candidates for Android? The best litmus test is whether the package offers general-purpose functionality, as opposed to having an integral dependency on iOS-specific frameworks. Some examples of good candidates are:
- Business logic
- Algorithms and generic data structures
- Networking utilities
- Online web service and API clients
- Data persistence
- Parsers and formatters
On the flip side, examples of packages that would be challenging to bring to Android might be:
- Custom UIKit components
- HealthKit, CarPlay, Siri integration libraries
- Other Apple-specific *Kit library integrations
Now, just because a Swift package is designed to work with an Apple-specific framework doesn’t mean that it is impossible to port to Android. It just means that it would be a signifiant amount of work and involve creating a bridge to the equivalent Kotlin or Java framework. This is by all means possible – and will be the topic of a future post – but the subject of this article is how to bring naturally portable Swift packages to Android.
Setup and Building
Section titled “Setup and Building”Say you have a conventional Swift package ↗ that contains a Package.swift file at the root and has the usual Sources/ and (hopefully) Tests/ folders that contain the individual targets and source files.
Does running swift build and swift test in the package directory work from the Terminal? If so, then you already have a cross-platform package that works on multiple platforms: iOS and macOS! That, by itself, is a good sign that your package might be suitable for Android. Many frameworks that are available on iOS are not present on macOS, so either your package doesn’t use too many iOS frameworks, or it is smart enough to only reference them conditionally (more on that below). But how do we build and test for Android?
First, install Skip and the native Android SDK by following the instructions in our documentation. Then try to build your Swift package with the Android toolchain. The very abbreviated quick start looks like:
$ brew install skiptools/skip/skip
…skip was successfully installed!
$ skip android sdk install
[✓] Install Swift Android SDK (2.4s)
$ cd MySwiftPackage/$ skip android build
Building for debugging...[0/2] Write sources…[4/4] Emitting module DemoPackageBuild complete! (1.85s)
If you see “Build complete!” then congratulations! Your package already builds for Android, and you can move on to the Testing section. But if you encounter errors from the build command, you will need to port your package over to Android. Read on…
Porting your Swift Package
Section titled “Porting your Swift Package”Wikipedia defines porting ↗ as the “process of adapting software for the purpose of achieving some form of execution in a computing environment that is different from the one that a given program (meant for such execution) was originally designed for”.
In other words, you made your Swift package with iOS in mind, and now you want it to work on Android. The following sections will go over some of the most common issues you may hit when first trying to build your package on this new platform.
Conditionally Importing and Using Platform-Specific Modules
Section titled “Conditionally Importing and Using Platform-Specific Modules”Suppose your Swift package defines an Event protocol with a simple default implementation:
protocol Event {    var dateRange: Range<Date> { get }    var isConfirmed: Bool { get }}
struct SimpleEvent : Hashable, Codable {    let start, end: Date    let confirmed}
extension SimpleEvent : Event {    var dateRange: Range<Date> { self.start..<self.end }    var isConfirmed: Bool { confirmed }}
Your package also includes an extension to implement Event using the iOS EventKit ↗ framework, like so:
import EventKit
extension EKEvent : Event {    var dateRange: Range<Date> { self.startDate..<self.endDate }    var isConfirmed: Bool { self.status == .confirmed }}
EventKit is an Apple-only framework, so when you try to build the package for Android, you will hit an error:
$ skip android build
 7 | import EventKit   |        `- error: no such module 'EventKit'
The solution to this is simple: wrap any code that references the missing module in #if canImport(EventKit), which conditionally compiles the code only when the specified module is available:
protocol Event {    var dateRange: Range<Date> { get }    var isConfirmed: Bool { get }}
struct SimpleEvent : Hashable, Codable {    let start, end: Date    let confirmed}
extension SimpleEvent : Event {    var dateRange: Range<Date> { self.start..<self.end }    var isConfirmed: Bool { confirmed }}
#if canImport(EventKit)import EventKit
extension EKEvent : Event {    var dateRange: Range<Date> { self.startDate..<self.endDate }    var isConfirmed: Bool { self.status == .confirmed }}#endif
Now you will have all the general functionality of the package available to Android, which you can adapt for any Android-specific data structures you may create in the future.
Importing the Foundation Sub-Modules
Section titled “Importing the Foundation Sub-Modules”Consider the following simple utility that fetches a URL and decodes it into an Item struct:
import Foundation
struct Item: Decodable {    let id: Int    let name: String}
func fetch(_ url: URL) async throws -> Item {    let (data, response) = try await URLSession.shared.data(from: url)    return try JSONDecoder().decode(Item.self, from: data)}
You may be surprised to see this fail to compile for Android:
$ skip android build
Building for debugging...Fetcher.swift:9:49: error: type 'URLSession' (aka 'AnyObject') has no member 'shared' 7 | 8 | func fetch(_ url: URL) async throws -> Item { 9 |     let (data, response) = try await URLSession.shared.data(from: url)   |                                                 `- error: type 'URLSession' (aka 'AnyObject') has no member 'shared'10 |     return try JSONDecoder().decode(Item.self, from: data)11 | }
This somewhat confusing error message just means that it can’t find the URLSession type, because it isn’t present in the Foundation module on Android.
On Darwin platforms (macOS, iOS, and other Apple operating systems), the Foundation module is an umbrella for a wide variety of functionality. But on other platforms, such as Android and Linux, Foundation is broken up into multiple separate sub-components:
FoundationEssentials: All the basic Foundation types:Date,Calendar,URL,IndexSet, etc.FoundationInternationalization:DateFormatter,NumberFormatter, and other localization utilitiesFoundationNetworking:URLSession,URLCache, and other networking utilitiesFoundationXML:XMLParser
The solution to this is simple: add a conditional import of FoundationNetworking to any file that uses any networking functionality, like so:
import Foundation#if canImport(FoundationNetworking)import FoundationNetworking#endif
struct Item: Decodable {    let id: Int    let name: String}
func fetch(_ url: URL) async throws -> Item {    let (data, response) = try await URLSession.shared.data(from: url)    return try JSONDecoder().decode(Item.self, from: data)}
This will include the required FoundationNetworking module for platforms like Android and Linux that need it, but quietly ignore it on Darwin platforms like iOS and macOS where the networking types are included with the monolithic Foundation framework.
Importing the Android Module
Section titled “Importing the Android Module”Swift has excellent integration with C, and many useful functions come in from the system’s C library, which is called Darwin on macOS and iOS. Take the simple example of calculating the hypotenuse of a triangle, which uses some math functions brought in from the standard C library:
import Darwin
func hypotenuse(a: Double, b: Double) -> Double {    return sqrt(pow(a, 2) + pow(b, 2))}
If you try to build this for Android, you will hit the error:
1 | import Darwin | `- error: no such module 'Darwin'This is because the Darwin module doesn’t exist for Android. It is instead simply called Android. Again, we solve this with our handy conditional canImport:
#if canImport(Darwin)import Darwin#elseif canImport(Android)import Android#else#error("Unknown platform")#endif
func hypotenuse(a: Double, b: Double) -> Double {    return sqrt(pow(a, 2) + pow(b, 2))}
In this case, we import either Darwin on iOS and macOS, or Android on Android. Both of these will provide access to the system’s standard C library.
Low-level C Issues
Section titled “Low-level C Issues”Simple C functions (like pow and sqrt) will generally be surfaced in exactly the same way on Darwin and Android platforms. But the definition of some functions and data structures in the Android C library can sometimes differ in subtle ways. For example, the following code uses the FILE type and fopen and fwrite C functions on Darwin platforms:
import Darwin
let fd: UnsafeMutablePointer<FILE> = fopen("file.txt", "w")var buffer: [UInt8] = [1, 2, 3]let count: Int = buffer.withUnsafeBufferPointer { ptr in    fwrite(ptr.baseAddress, MemoryLayout<UInt8>.stride, ptr.count, fd)}
This will fail to build for Android:
$ skip android build
FileWrite.swift:15:30: error: cannot find type 'FILE' in scope13 | #endif14 |15 | let fd: UnsafeMutablePointer<FILE> = fopen("file.txt", "w")   |                              `- error: cannot find type 'FILE' in scope16 | var buffer: [UInt8] = [1, 2, 3]17 | let count: Int = buffer.withUnsafeBufferPointer { ptr in
FileWrite.swift:18:16: error: value of optional type 'UnsafePointer<UInt8>?' must be unwrapped to a value of type 'UnsafePointer<UInt8>'16 | var buffer: [UInt8] = [1, 2, 3]17 | let count: Int = buffer.withUnsafeBufferPointer { ptr in18 |     fwrite(ptr.baseAddress, MemoryLayout<UInt8>.stride, ptr.count, fd)   |                |- error: value of optional type 'UnsafePointer<UInt8>?' must be unwrapped to a value of type 'UnsafePointer<UInt8>'   |                |- note: coalesce using '??' to provide a default when the optional value contains 'nil'   |                `- note: force-unwrap using '!' to abort execution if the optional value contains 'nil'19 | }20 |
There are two separate issue here:
FILEdoesn’t exist on Android, soUnsafeMutablePointer<FILE>must be replaced withOpaquePointer- Functions like
fwritethat take a file pointer will not accept an optional, and so must be force-unwrapped from their pointer’srawValue
The following conditional typealias will handle the first issue, and simply force-unwrapping the pointer’s address (which should be valid on all platforms) addresses the second:
#if canImport(Darwin)import Darwin#elseif canImport(Android)import Android#else#error("Unknown platform")#endif
#if os(Android)typealias Descriptor = OpaquePointer#elsetypealias Descriptor = UnsafeMutablePointer<FILE>#endif
let fd: Descriptor = fopen("file.txt", "w")var buffer: [UInt8] = [1, 2, 3]let count: Int = buffer.withUnsafeBufferPointer { ptr in    fwrite(ptr.baseAddress!, MemoryLayout<UInt8>.stride, ptr.count, fd)}
Unless you are developing very low-level code that interfaces with the platform’s C library, you will rarely encounter these sorts of issues. But when you do, it is good to know that the solutions tend the be fairly simple. The most difficult part is often just deciphering the compilation failure message.
Testing
Section titled “Testing”So now your package builds for Android with the command: skip android build. Amazing!
But you are only halfway there: you need to make sure your code not only builds for Android, but that it actually works. Hopefully, your Swift package includes test cases in the Test/ folder, and running the tests locally on your macOS machine with swift test works. For example, with the swift-algorithms ↗ package:
$ swift testBuilding for debugging...[78/78] Linking swift-algorithmsPackageTestsBuild complete! (12.67s)
Test Suite 'All tests' started at 2025-01-21 19:25:03.841.Test Suite 'swift-algorithmsPackageTests.xctest' started at 2025-01-21 19:25:03.842.Test Suite 'AdjacentPairsTests' started at 2025-01-21 19:25:03.842.Test Case '-[SwiftAlgorithmsTests.AdjacentPairsTests testEmptySequence]' started.Test Case '-[SwiftAlgorithmsTests.AdjacentPairsTests testEmptySequence]' passed (0.002 seconds).Test Case '-[SwiftAlgorithmsTests.AdjacentPairsTests testIndexTraversals]' started.Test Case '-[SwiftAlgorithmsTests.AdjacentPairsTests testIndexTraversals]' passed (0.002 seconds).…Test Suite 'All tests' passed at 2025-01-21 19:25:05.718. Executed 212 tests, with 0 failures (0 unexpected) in 1.870 (1.876) seconds
In order to run your tests on Android, you will need to either plug in an Android device (with USB debugging ↗ enabled), or else configure and launch an Android emulator, either from the command line or Android Studio ↗).
Once you have your Android development target setup, you can run your package’s test cases with the skip android test command, which will compile the test cases, bundle them up (along with any associated resources), copy them to the Android device or emulator, and then execute the test cases remotely.
For example, for the swift-algorithms package:
% skip android test[0/1] Planning buildBuilding for debugging...…[83/84] Linking swift-algorithmsPackageTests.xctest
Build complete! (11.68s)
[✓] Check Swift Package (0.87s)[✓] Connecting to Android (0.18s)[✓] Copying test files (0.88s)
Test Suite 'All tests' started at 2025-01-21 21:02:09.086Test Suite 'swift-algorithms-1C77777B-CEC3-4075-8853-E77CECFCF30B.xctest' started at 2025-01-21 21:02:09.105Test Suite 'AdjacentPairsTests' started at 2025-01-21 21:02:09.105Test Case 'AdjacentPairsTests.testEmptySequence' started at 2025-01-21 21:02:09.105Test Case 'AdjacentPairsTests.testEmptySequence' passed (0.014 seconds)Test Case 'AdjacentPairsTests.testIndexTraversals' started at 2025-01-21 21:02:09.120Test Case 'AdjacentPairsTests.testIndexTraversals' passed (0.004 seconds)…Test Suite 'All tests' passed at 2025-01-21 21:02:21.697     Executed 212 tests, with 0 failures (0 unexpected) in 12.579 (12.579) seconds
If there are any test failures, this is where you will delve into the details of your test case, isolate the problem, and apply fixes. There are many reasons why tests may fail, such as assumptions about the filesystem layout. These will need to be examined and resolved on a case-by-case basis.
Once all your tests pass, you’ve successfully brought your Swift package to Android!
Bonus: Continuous Integration
Section titled “Bonus: Continuous Integration”Once you have your package building and your tests passing, you will want to ensure that they continue to pass. Maintaining a package that supports multiple platforms can be more challenging than just a single platform, because often when a new feature is implemented or a bug is fixed, the change will only be tested on the platform the developer is currently working with. For example, if you are working on the iOS side of your application and make a bug fix in one of your packages, you may only test the changes on that one platform, but it may inadvertently break something on another platform.
This is where continuous integration (CI) can be useful. If you use GitHub as your package’s source code management system, you can utilize GitHub Actions ↗ to automatically build and test your package on multiple platforms whenever you push to the repository or, for example, whenever a pull request is created from a branch or fork.
In order to facilitate Android CI, we provide the swift-android-action ↗, which enables you to build and test your package against Android in a single line of configuration.
The following example of a .github/workflows/ci.yml script will build and test your package on each of macOS, iOS, Linux, and Android whenever a commit is pushed or a PR is created:
name: swift package cion: push: branches: - '*' workflow_dispatch: pull_request: branches: - '*'jobs: linux-android: runs-on: ubuntu-latest steps: - uses: actions/checkout@v4 - name: "Test Swift Package on Linux" run: swift test - name: "Test Swift Package on Android" uses: skiptools/swift-android-action@v2 macos-ios: runs-on: macos-latest steps: - uses: actions/checkout@v4 - name: "Test Swift Package on macOS" run: swift test - name: "Test Swift Package on iOS" run: xcodebuild test -sdk "iphonesimulator" -destination "platform=iOS Simulator,name=iPhone 15" -scheme "$(xcodebuild -list -json | jq -r '.workspace.schemes[-1]')"You can see this workflow in play in many of the packages on GitHub that support Android, such as Skip’s own swift-sqlcipher ↗ package.
In this way, you can be assured that once you have done the hard work of getting your package working with Android, it continues to work on all your supported platforms.
Conclusion
Section titled “Conclusion”Expanding your Swift packages to support platforms beyond iOS may at first seem daunting, but using the advice from this article, you can follow a few simple steps that will put you on the right track:
- Setup Skip and the Swift Android SDK
- Try to build your package with
skip android build - Identify build errors and resolve them with conditional imports and by accommodating platform differences
- Set up an Android emulator or device for testing
- Test your package with
skip android test - Identify test failures and resolve them on a case-by-case basis
This is the sequence we have used to add Android support to dozens of popular Swift packages, such as GraphQL ↗, CryptoSwift ↗, and PromiseKit ↗. With nearly 2,000 Swift packages currently building for Android, we feel the platform has achieved enough critical mass to make Swift an attractive language for many parts of your apps on both major mobile platforms: iOS and Android. And if you have a popular GitHub package that builds for Android, expect it to show up at swift-everywhere.org ↗ in the near future!
Native Swift on Android Series
Section titled “Native Swift on Android Series”To learn more about running Swift on Android and how it integrates with Skip’s tools for creating dual-platform mobile apps, please see our ongoing blog series on the topic:
- Part 1: A native Swift toolchain for Android
- Part 2: Your first native Swift Android app
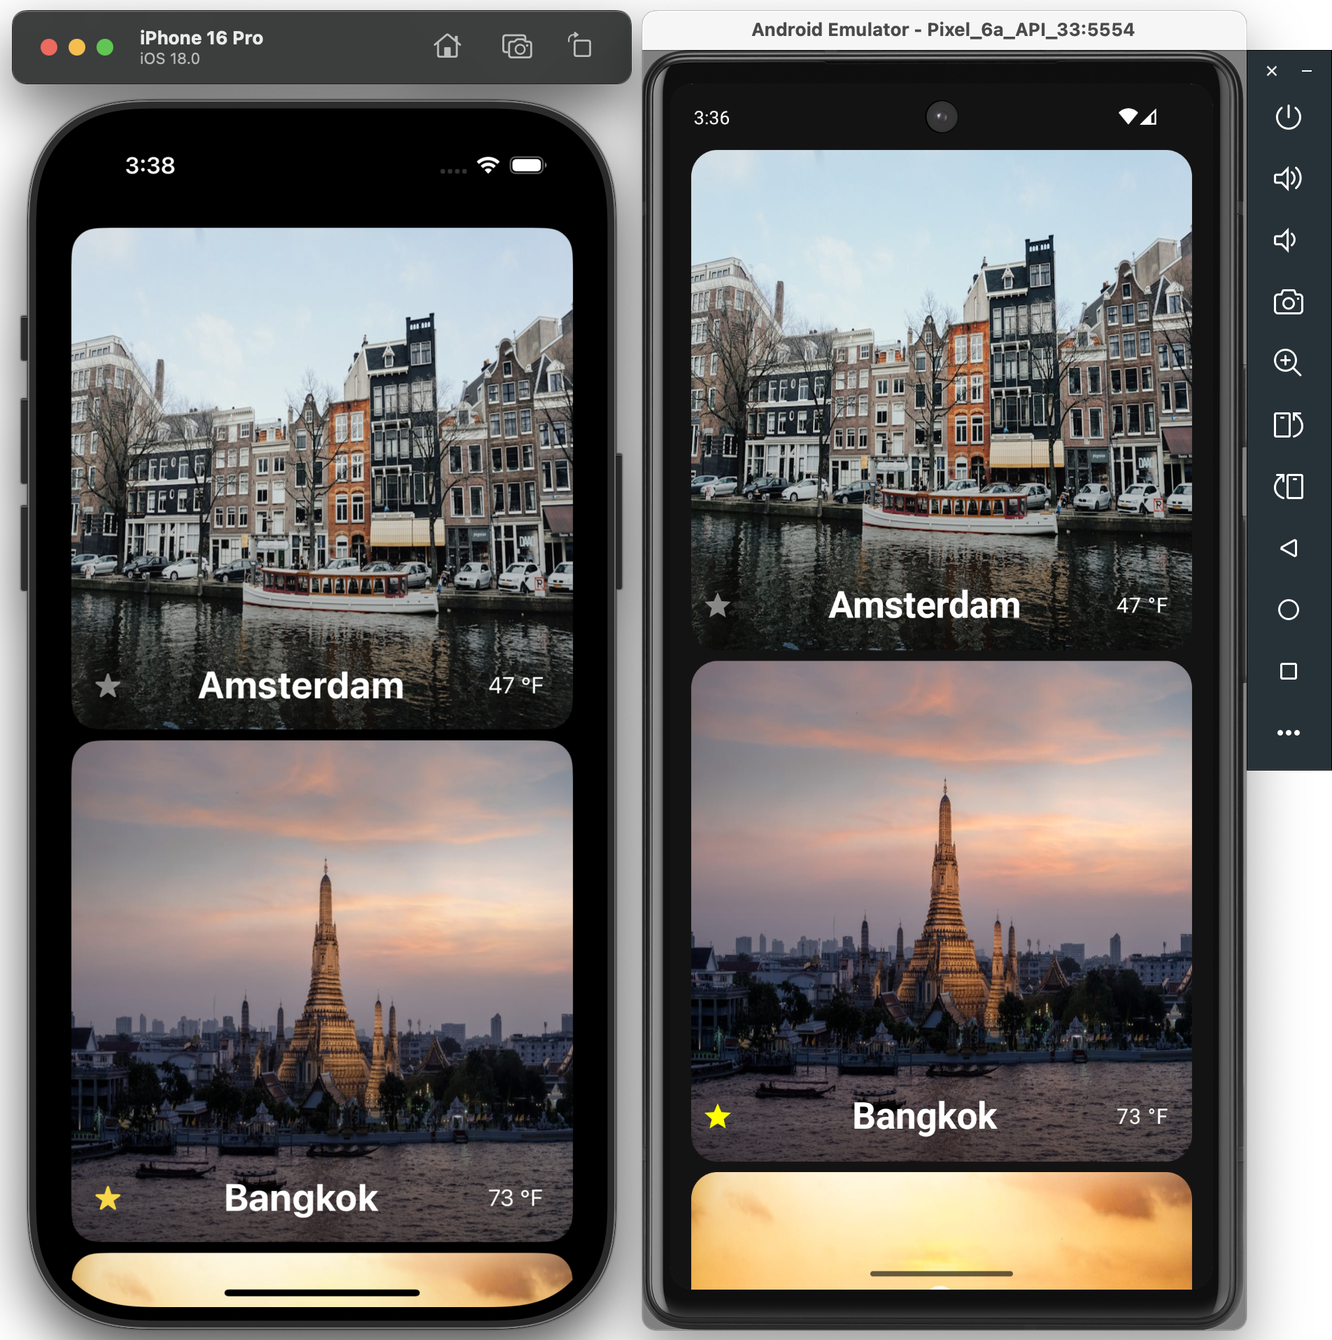
- Part 3: Using a shared native Swift model to power separate SwiftUI iOS and Jetpack Compose Android apps
- Coming soon: Bridging Kotlin and Java API for consumption by native Swift
- Coming soon: Incorporating native Swift, C, and C++ dependencies into your cross-platform Swift apps